A Beginner’s Guide to Deploying Microservices: Jenkins, AWS EKS, and Azure App Service
Learn How to Deploy Microservices for Inventory, Shopping Cart, and Order APIs Step by Step

If you’re new to deployment techniques and microservices, this blog will guide you step-by-step. We’ll focus on deploying three simple APIs (Inventory, Shopping Cart, and Order APIs) using three different deployment methods:
- Jenkins: For automating CI/CD pipelines.
- AWS EKS: For Kubernetes-based deployment.
- Azure App Service: For easy cloud deployment in Azure.
Let’s start by understanding the big picture before diving into details.
What Are Deployments in Microservices?
When you build an application, the next step is to make it live so users can access it. Deployment is the process of packaging and running your application on servers, whether on-premises or in the cloud.
📌Explore more at: https://dotnet-fullstack-dev.blogspot.com/
🌟 Clapping would be appreciated! 🚀
In a microservice architecture, each service (like Inventory, Shopping Cart, and Order APIs) runs independently. This means each service needs its own deployment process.
Our Sample Application
We’ll work with three APIs:
- Inventory API: Manages stock of products.
- Shopping Cart API: Adds/removes items to a cart.
- Order API: Places orders and updates inventory.
For deployment, we’ll Dockerize these APIs and then deploy them using:
- Jenkins for automation.
- AWS EKS for scalable Kubernetes-based deployment.
- Azure App Service for quick cloud hosting.
Step 1: Containerize Your Application Using Docker
Before deploying, let’s create a Docker image for our services. Docker allows you to package your application with all its dependencies, making it portable and easy to deploy anywhere.
Dockerfile for Each Service
Add a Dockerfile in the root folder of each API (Inventory, Shopping Cart, and Order APIs):
# Step 1: Use .NET SDK to build the application
FROM mcr.microsoft.com/dotnet/sdk:6.0 AS build
WORKDIR /app
COPY . .
RUN dotnet publish -c Release -o out

# Step 2: Use .NET Runtime for running the app
FROM mcr.microsoft.com/dotnet/aspnet:6.0
WORKDIR /app
COPY --from=build /app/out .
ENTRYPOINT ["dotnet", "YourServiceName.dll"]
Replace YourServiceName.dll with the name of your service (e.g., InventoryAPI.dll).
Build and Push Docker Images
Run the following commands for each service:
Build the Image:
docker build -t your-dockerhub/your-api-name:latest .Push the Image to Docker Hub:
docker push your-dockerhub/your-api-name:latestNow that your images are ready, let’s look at how to deploy them.
Step 2: Deploy Using Jenkins
Jenkins is an automation tool used to build, test, and deploy your applications. It helps you set up a CI/CD pipeline that automates deployment when you push changes to your code.
Steps to Deploy with Jenkins
Install Jenkins: Install Jenkins on your local machine or a server.
Install Required Plugins:
- Docker plugin
- Kubernetes plugin (optional for EKS)
Create a Jenkins Pipeline: Add a file named Jenkinsfile to your project.
Sample Jenkinsfile:
pipeline {
    agent any

    stages {
        stage('Build Docker Image') {
            steps {
                sh 'docker build -t your-dockerhub/inventory-api:latest .'
            }
        }

        stage('Push to Docker Hub') {
            steps {
                sh 'docker push your-dockerhub/inventory-api:latest'
            }
        }

        stage('Deploy') {
            steps {
                sh 'kubectl apply -f inventory-deployment.yaml'
            }
        }
    }
}
Run the Jenkins Pipeline:
- Commit your code.
- Jenkins will automatically build, push, and deploy your service.
Step 3: Deploy on AWS EKS (Elastic Kubernetes Service)
AWS EKS is a managed Kubernetes service that helps you deploy applications with high scalability and fault tolerance.
Steps to Deploy on AWS EKS
Set Up Kubernetes on AWS:
- Create an EKS cluster using the AWS CLI or AWS Console.
Create Kubernetes Deployment Manifests:
inventory-deployment.yaml:
apiVersion: apps/v1
kind: Deployment
metadata:
  name: inventory-api
spec:
  replicas: 2
  selector:
    matchLabels:
      app: inventory-api
  template:
    metadata:
      labels:
        app: inventory-api
    spec:
      containers:
      - name: inventory-api
        image: your-dockerhub/inventory-api:latest
        ports:
        - containerPort: 80
Deploy to EKS:
Apply the manifest using kubectl:
kubectl apply -f inventory-deployment.yamlVerify Deployment:
kubectl get podsStep 4: Deploy on Azure App Service
Azure App Service provides an easy way to deploy applications to the cloud with minimal configuration.
Steps to Deploy on Azure
Create Azure App Services:
- Go to the Azure portal.
- Create three App Services (one for each API).
Deploy the Docker Image:
Use Azure CLI to deploy the service:
az webapp create --name InventoryAPI --plan YourAppServicePlan --runtime "DOTNETCORE|6.0"
az webapp config container set --name InventoryAPI --docker-custom-image-name your-dockerhub/inventory-api:latest
Repeat the above steps for the Shopping Cart and Order APIs.
Test Your App:
Access your services using the URLs provided by Azure App Service.
Step 5: Testing Your Deployment
Test the APIs using tools like Postman or Swagger:
Inventory API: Check stock levels.
GET http://<service-url>/api/inventory/Product1Shopping Cart API: Add items to the cart.
POST http://<service-url>/api/shoppingcart/add-item
Content-Type: application/json
{ "ProductId": "Product1", "Quantity": 2 }
Order API: Place an order.
POST http://<service-url>/api/order/place-order
Content-Type: application/json
{ "ProductId": "Product1", "Quantity": 2 }
Comparison of Deployment Methods
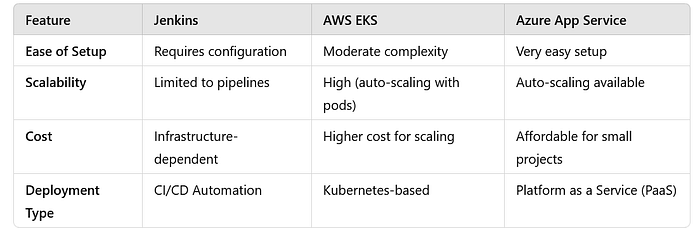
Conclusion
In this blog, we created and deployed Inventory, Shopping Cart, and Order APIs using three different deployment techniques: Jenkins, AWS EKS, and Azure App Service.
- Jenkins automates builds and deployments through CI/CD pipelines.
- AWS EKS provides robust and scalable Kubernetes-based deployments.
- Azure App Service simplifies deployment with a focus on ease of use.
If you’re just starting, Azure App Service is the easiest way to get your APIs live. For scalability and advanced management, consider AWS EKS or automating with Jenkins.
Which deployment method did you try first? Let me know in the comments!
